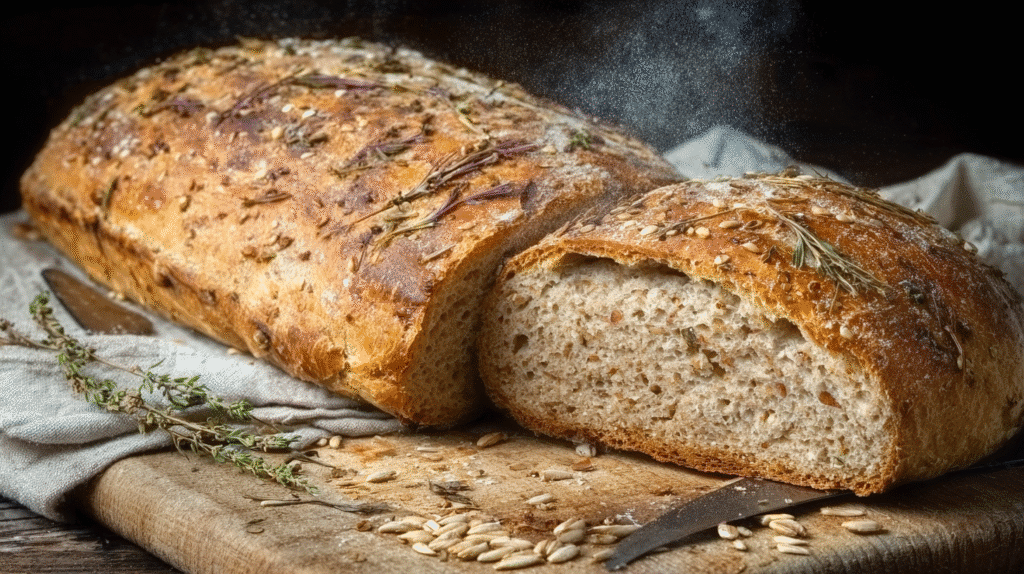
Freshly milled bread recipe is more than just a phrase—it’s a return to real nourishment, old-world tradition, and hands-on craftsmanship. In this article, you’ll learn how to create your own soft, fluffy, and wholesome whole wheat loaves using fresh milled flour. Whether you’re new to milling your own grains or just trying to perfect that store-bought texture at home, this guide is your all-in-one resource. We’ll walk through step-by-step instructions, troubleshooting tips, multiple baking methods, and ingredient science—because making great bread isn’t just about following a recipe, it’s about understanding the process.

Part 1: The Fresh Start – A Personal Journey with Freshly Milled Bread
Why Freshly Milled Bread Became My Family’s Favorite Loaf
There’s a special kind of magic that happens when you mill your own flour and bake bread from scratch. I didn’t grow up in a farmhouse or with a wood-fired oven, but I did grow up around the kitchen—watching my family connect through food, especially the kind made with care and patience. That connection is what brought Recent Recipe to life: to turn ordinary meals into meaningful rituals, no matter the season or skill level.
When I first tried baking with fresh milled flour, the learning curve was real. The dough was sticky, the crumb was dense, and the results—well, let’s just say the chickens enjoyed them more than we did. But with each attempt, I gained what I now call “dough IQ”—a deeper understanding of how whole grains behave and how subtle tweaks create seriously satisfying results.
Now, our weekly loaf is not just better than store-bought—it’s alive with flavor, rich in nutrients, and part of the rhythm that makes our kitchen feel like home. That’s the soul of a truly great freshly milled bread recipe.
What Makes Fresh Milled Flour Different (And Better)
Using freshly milled flour means grinding whole wheat berries right before baking. Unlike processed flour, which has the bran and germ stripped away, fresh flour keeps all three parts of the grain intact. This gives it a deeper flavor, fuller texture, and more nutrition—especially B vitamins, fiber, and essential oils that are usually lost during refining.
The result? Bread that actually nourishes. You’ll taste the grain’s natural sweetness, feel the hearty crumb, and know your loaf didn’t come from a plastic bag pumped with preservatives. But fresh flour isn’t just better—it behaves differently. It absorbs water slowly, it needs more kneading, and it’s less forgiving. That’s why most beginners struggle with their first freshly milled bread recipe—until they understand the « why » behind each step.
This guide breaks it all down. From ingredient choices to rising environments, we’ll cover it all—so you’re not just baking by instructions, you’re baking with confidence.
Part 2: Ingredients & Instructions for the Best Freshly Milled Bread Recipe
Print
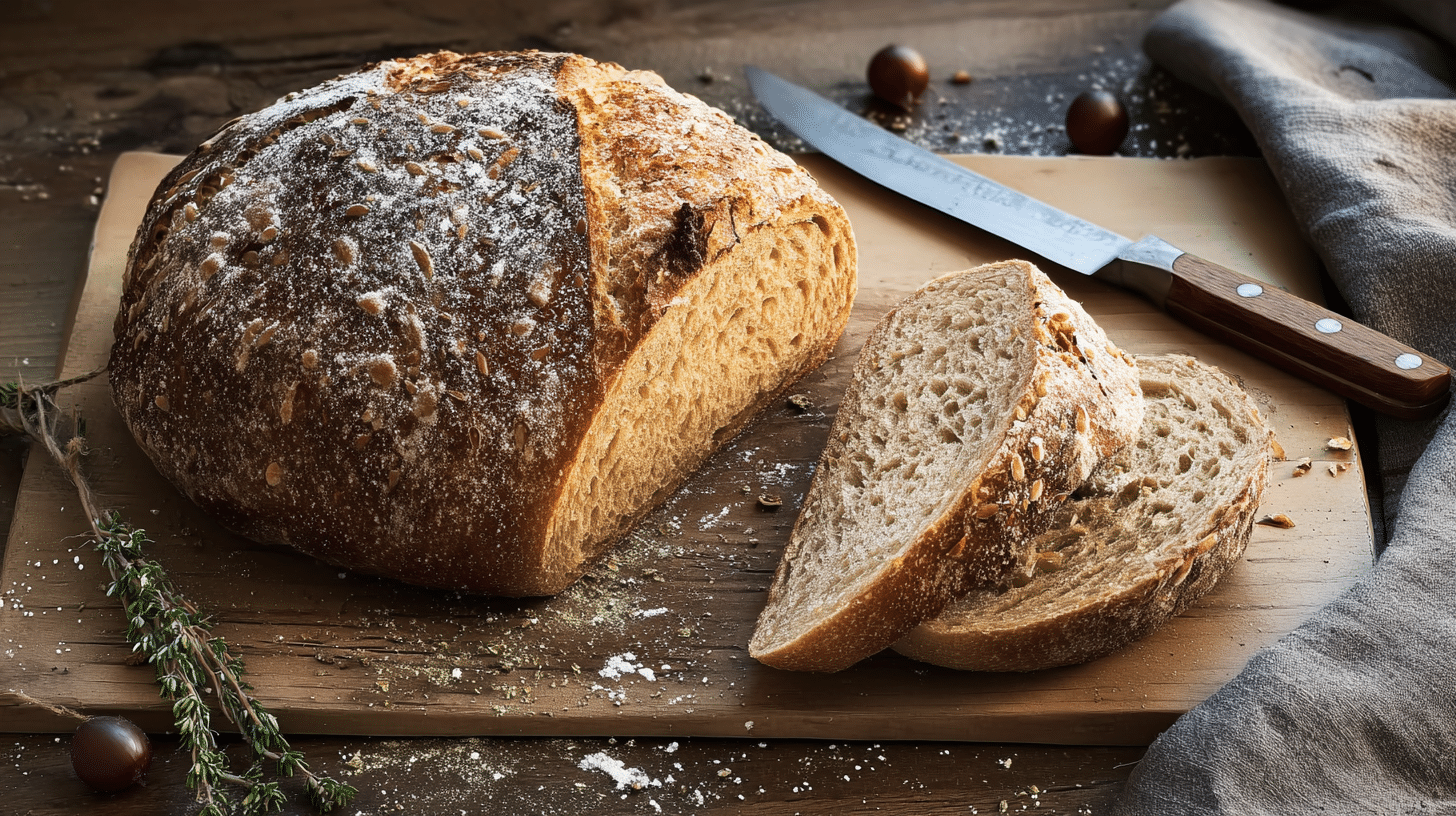
Freshly Milled Bread Recipe for Soft, Homemade Loaves Every Time
- Total Time: 2 hours 50 minutes
- Yield: 2 loaves 1x
- Diet: Vegetarian
Description
Soft, fluffy, and nourishing whole wheat bread made from freshly milled flour. This reliable recipe includes mixer, hand, and bread machine methods.
Ingredients
4 ½ cups freshly milled flour (540g)
2 ¼ cups warm water (532g)
½ cup olive oil (108g)
¼ cup honey or cane sugar (60g)
1 large egg (50g)
1 ¾ tbsp active dry or instant yeast (14g)
3 tsp fine salt (18g)
½ tbsp sunflower lecithin (optional, 6g)
1 tbsp vital wheat gluten (optional, 8g)
Instructions
1. Mill the wheat berries to yield 4.5 cups flour and let it rest 10 minutes.
2. Combine warm water, oil, honey, egg, salt, lecithin, and 3.5 cups flour in mixer bowl.
3. Sprinkle yeast on top and let sit 1 minute, then mix on low speed for 1 minute.
4. Add remaining flour slowly, ½ cup at a time, until dough pulls from sides.
5. Knead 12–15 minutes until dough is soft and passes windowpane test.
6. Cover and let rise 1 hour or until doubled. Shape and place into loaf pans.
7. Let rise again 40–60 minutes. Preheat oven to 400°F.
8. Bake 10 minutes, brush with milk or egg wash, reduce heat to 350°F, and bake 12–15 minutes.
9. Loaf is ready when internal temp reaches 200°F. Cool fully before slicing.
Notes
Use hard white or red wheat berries for best flavor and texture.
Wrap cooled bread in linen or freeze in slices to keep fresh longer.
Great base dough for cinnamon rolls, dinner rolls, or hamburger buns.
- Prep Time: 25 minutes
- Cook Time: 25 minutes
- Category: Bread
- Method: Baking
- Cuisine: American
Nutrition
- Serving Size: 1 slice
- Calories: 62
- Sugar: 2g
- Sodium: 150mg
- Fat: 4g
- Saturated Fat: 0.5g
- Unsaturated Fat: 3.2g
- Trans Fat: 0g
- Carbohydrates: 6g
- Fiber: 1.5g
- Protein: 2g
- Cholesterol: 10mg
Keywords: freshly milled bread recipe, fresh milled flour, whole wheat bread
Key Ingredients for Soft, Fluffy Whole Wheat Bread
When crafting a truly reliable freshly milled bread recipe, your ingredients do more than build flavor—they control structure, rise, texture, and shelf life. Here is a comprehensive list with measurements provided in both volume and weight to ensure consistency. These ingredients are tested with fresh milled flour, which absorbs moisture differently than store-bought flour.
| Ingredient | Volume | Weight (grams) |
|---|---|---|
| Hard white or red wheat berries (to mill) | 4 ½ cups flour total | 540 g |
| Warm water (110–115°F) | 2 ¼ cups | 532 g |
| Olive oil (light or extra virgin) | ½ cup | 108 g |
| Honey or cane sugar | ¼ cup | 60 g |
| Large egg | 1 | 50 g |
| Active dry yeast or instant yeast | 1 ¾ tbsp | 14 g |
| Salt (fine ground) | 3 tsp | 18 g |
| Sunflower lecithin (optional) | ½ tbsp | 6 g |
| Vital wheat gluten (optional but helpful) | 1 |
Why each matters:
- Sunflower lecithin improves softness and elasticity.
- Vital wheat gluten is a must if you’re aiming for sandwich-style, fluffy slices.
- Honey or sugar serves as food for the yeast, helping to ensure a dependable rise.
Step-by-Step Instructions: Mixer, By Hand & Bread Machine
Whether you’re working with a Bosch mixer, kneading by hand, or using a bread machine, this freshly milled bread recipe adapts easily.
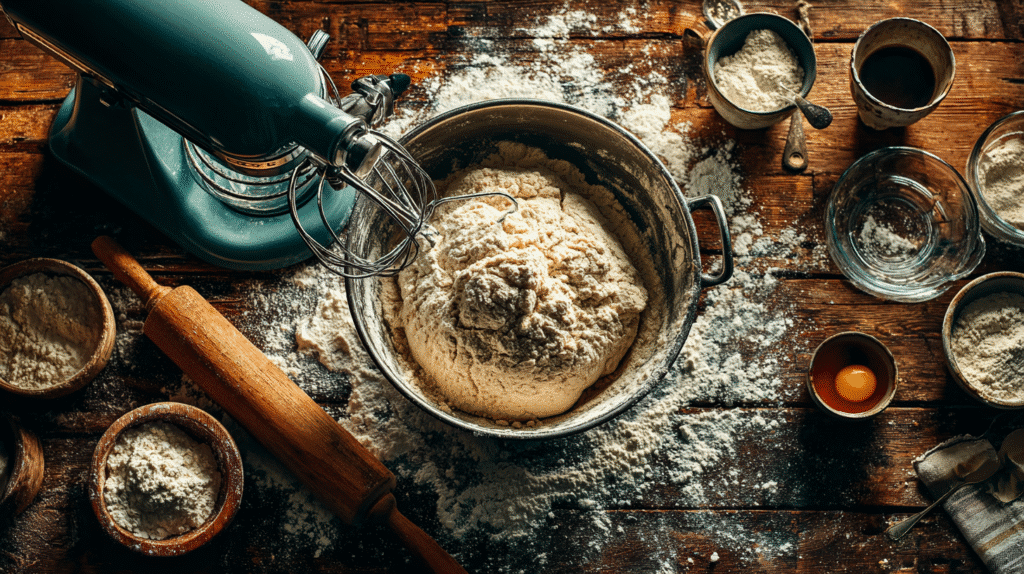
Method 1: Stand Mixer (Bosch or KitchenAid)
- Mill 4.5 cups of hard wheat berries just before baking. Let the flour rest 10 minutes.
- In a stand mixer bowl, combine warm water, oil, honey/sugar, egg, salt, lecithin (optional), and 3.5 cups of flour.
- Sprinkle yeast over the top and let sit 1 minute.
- Mix on low speed (1) for 1 minute.
- Slowly add the remaining flour, ½ cup at a time, until the dough pulls away from the sides.
- Increase to speed 2 and knead for 12–15 minutes, until soft, slightly tacky, and passes the windowpane test.
- Cover and let rise in a warm place for 60 minutes or until doubled.
- Divide dough, shape into loaves, and place into greased or parchment-lined pans.
- Cover and rise again for 40–60 minutes, until dough is just above pan rim.
- Preheat oven to 400°F. Bake 10 minutes, brush with milk or egg wash, reduce temp to 350°F, and bake another 12–15 minutes or until internal temp hits 200°F.
- Cool on a wire rack before slicing.
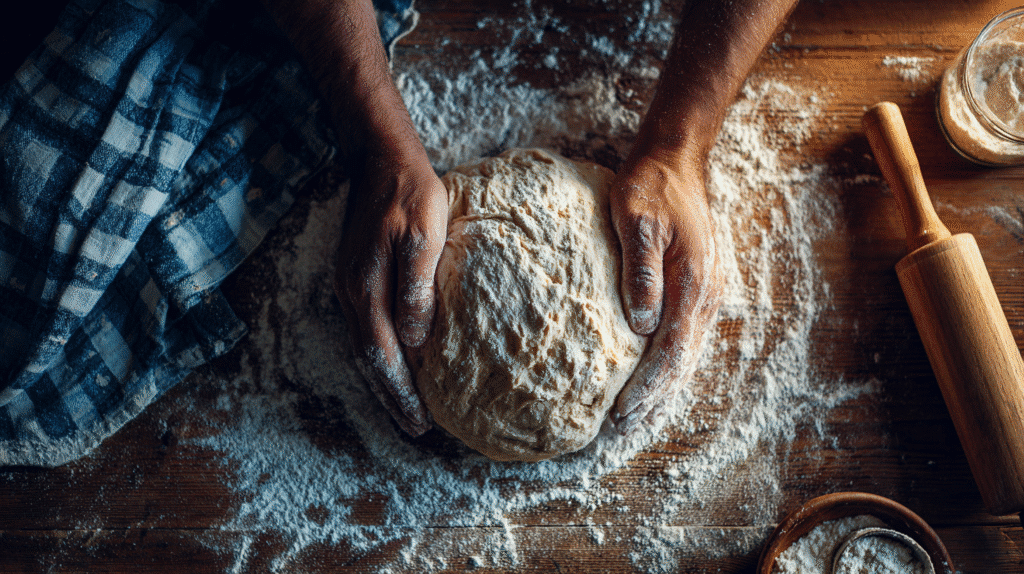
Method 2: By Hand
- Follow the same mixing steps, but knead by hand for 20–25 minutes. Use a dough scraper to help with stickiness and take breaks as needed.
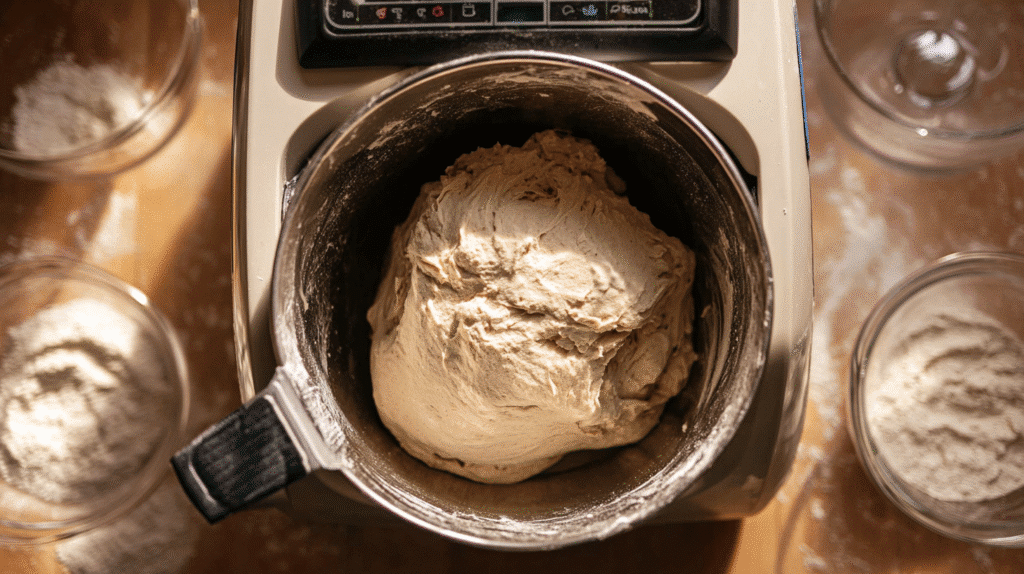
Method 3: Bread Machine
- Add ingredients in this order: liquids first, then flour, then yeast on top (avoid direct yeast-salt contact).
- Use the whole wheat setting if available. Remove dough before final rise and shape in loaf pans for best structure.
No matter the method, this freshly milled bread recipe delivers bakery-quality texture with just a little patience—and a warm kitchen helps too.
Part 3: Mastering the Process – Pro Tips & Techniques
The Science of Soft: Why Your Dough Feels Different
One of the biggest challenges with any freshly milled bread recipe is the unpredictable nature of whole grain flour. Unlike commercial flour, which is refined, sifted, and standardized, fresh flour is alive—rich with oils, bran, and germ. It absorbs water slowly and demands more from the baker.
Hydration is key.
Fresh milled flour needs more time to absorb moisture. That’s why the autolyse method—resting the flour and water together before kneading—is such a game changer. Just 20 minutes of resting helps soften the bran and create a smoother texture.
Gluten development matters.
Freshly milled whole wheat has lower inherent gluten strength than white flour. Adding vital wheat gluten helps, but your kneading technique is crucial. Perform the windowpane test by gently stretching a small piece of dough. If it thins out without tearing, your dough is ready. If not, knead longer.
Watch the yeast.
Yeast is your lift. If yours isn’t fresh, it won’t rise well. Store active dry or instant yeast in the freezer in an airtight jar, and label it with a date. Always use water between 105–115°F to activate it properly.
The environment counts.
A cold kitchen will slow your rise. Use a proofing box, an oven with the light on, or place your dough on top of a running dishwasher or with a heating pad under a towel. The ideal temp for proofing is 75–85°F.
Check the internal temperature.
When baking bread with whole grains, crust color can mislead you. Always test the center of the loaf. At 200°F, your bread is perfectly baked.
Avoid Common Mistakes: From Dense Loaves to Collapsed Crusts
Here’s the truth: every baker runs into a flop. But knowing what went wrong can help you get it right next time. Let’s break down the most common issues in this freshly milled bread recipe and how to fix them.
Q: Why is my bread dense and heavy?
- Your dough may have been under-kneaded or didn’t rise long enough.
- Try autolysing your flour and kneading until the dough passes the windowpane test.
- Add 1 tablespoon of vital wheat gluten per loaf to boost structure.
Q: Why did my loaf collapse after baking?
- This is usually from over-proofing. If dough rises too much, it runs out of structure and collapses in the oven.
- Only allow dough to rise just above the pan rim before baking.
Q: How do I get a soft crust instead of a hard one?
- Brush your loaves with milk or egg wash halfway through baking.
- After baking, cover warm loaves with a towel while cooling to trap steam and soften crust.
Q: My yeast didn’t get foamy. What now?
- Your water may have been too hot or your yeast expired. Always test with a small bowl of warm water + sugar and yeast first if you’re unsure.
- Try again with a fresh packet and proper water temp.
Bonus Tip: Don’t be afraid to replace ½ to 1 cup of freshly milled flour with bread flour if you’re new. It’ll make your dough easier to manage without sacrificing nutrition. Use this sandwich loaf variation to practice before moving fully into 100% fresh milled dough.
Part 4: Storing, Serving, and Using Your Bread
How to Store Freshly Milled Flour Bread (Without Losing Freshness)
Once your warm loaf is out of the oven and the aroma fills your kitchen, the next question is: how do I keep it fresh?
Freshly baked bread made with fresh milled flour doesn’t contain commercial preservatives, so proper storage is essential to extend its shelf life without compromising texture.
Here’s the best way to store your freshly milled bread recipe:
- Let the loaf cool completely on a wire rack to avoid condensation.
- Wrap in cotton or linen bread bags for the first day to maintain the crust while avoiding moisture buildup.
- For 2–3 day storage, use a bread box or an airtight container on the counter. Never refrigerate it—bread stales faster in the fridge.
- To freeze: Slice the bread, then layer slices in a freezer bag with parchment between. This way, you can toast one slice at a time.
- To reheat: Wrap a loaf in foil and warm at 300°F for 10–15 minutes. This revives softness without drying it out.
Avoid mold by keeping bread away from heat sources, direct sunlight, or damp counters. If you live in a humid climate, consider freezing half the loaf right away.
Pro tip: If your loaf goes stale, don’t toss it—turn it into French toast, croutons, or blend it into breadcrumbs for meatballs. Check our dinner category for more clever uses.
More Than Sandwiches: Creative Uses for Basic Bread Dough
This freshly milled bread recipe is so versatile, you can spin it into multiple recipes without changing the base. With a few tweaks in shaping and baking time, you’ve got an entire lineup of family favorites.
Cinnamon Rolls – Roll out the dough, spread with butter, cinnamon, and brown sugar, and slice into rolls. Let rise and bake at 350°F for 20–25 minutes.
Dinner Rolls – Divide dough into 12–16 balls, place in a greased pan, and bake at 375°F for 18–20 minutes.
Doughnuts – Roll and cut dough into rounds, fry in oil at 350°F, and dust with sugar or glaze.
Hamburger Buns – Gently press dough balls to flatten them slightly before the final rise. Bake at 375°F for 15–18 minutes.
Use this recipe to build your own content hub of homemade staples. Link out from here to your breakfast ideas or sweet dessert rolls.
This approach doesn’t just feed your family—it builds your skills and expands your meal plan.
Table of contents
Table of Contents
How soon do I need to use freshly milled flour?
Ideally, use it within 24 hours for best flavor and nutrition. While some let it rest 10–30 minutes to reduce heat and help hydration, avoid long storage—it loses nutrients and can go rancid.
Does freshly milled flour taste better?
Absolutely. It has a nuttier, more complex flavor than store-bought flour. It also contributes to richer aroma and more natural sweetness in every freshly milled bread recipe.
How do you store fresh milled flour bread?
Let it cool fully, wrap it in a breathable bag, and store in a bread box or airtight container. For longer storage, freeze slices and reheat as needed.
What are the benefits of fresh milled bread?
More nutrients (vitamins, fiber, and healthy oils), better taste, lower glycemic impact, and zero preservatives. You control what goes in—and what stays out.