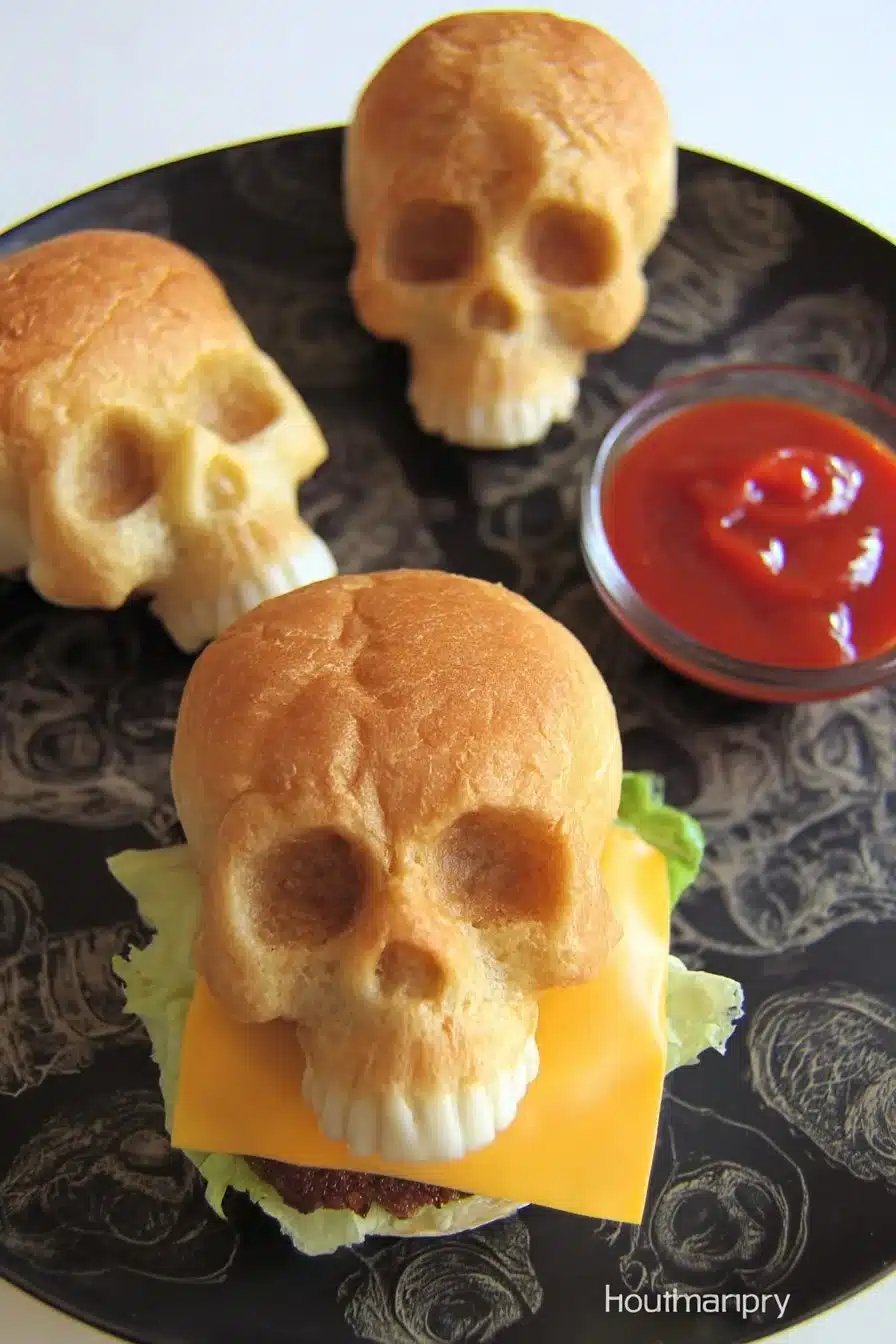
Cute, spooky, and oh-so-delicious, Cheeseburger Skulls are a fun twist on a classic favorite! Perfect for Halloween parties or a family movie night, these playful bites are filled with juicy ground beef, melty cheese, and zesty condiments, all encased in flaky pizza dough. They’re easy to make and sure to be a hit with kids and adults alike. Let’s get cooking and create some ghoulishly great eats that everyone will love!
Print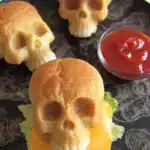
Cheeseburger Skulls
- Total Time: 35 minutes
- Yield: 4 servings 1x
Description
Cheeseburger Skulls are a spooky, fun twist on classic cheeseburgers! Juicy beef, melty cheese, and condiments are wrapped in flaky pizza dough, baked into skull shapes, and served as the ultimate Halloween party treat.
Ingredients
1 lb ground beef
1 cup shredded cheddar cheese
1/2 cup diced onions
1/4 cup ketchup
1/4 cup mustard
Salt and pepper to taste
1 package pizza dough
Food coloring (optional for decoration)
Instructions
1. Preheat oven to 400°F (200°C).
2. In a skillet, cook ground beef with onions, salt, and pepper over medium heat until browned. Drain excess fat.
3. Add shredded cheese, ketchup, and mustard to the beef. Stir until well combined.
4. Roll out pizza dough and cut into skull shapes with a knife or cookie cutter.
5. Spoon cheeseburger mixture onto each dough piece and seal edges firmly.
6. Place skulls on a baking sheet and bake for 15-20 minutes, until golden brown.
7. Optional: decorate with food coloring for a spooky finish.
8. Serve warm and enjoy!
Notes
Best served warm right out of the oven.
Pair with veggie sticks, chips, or a salad for a complete meal.
Store leftovers in an airtight container in the fridge up to 3 days. Reheat in the oven for best texture.
Freeze unbaked skulls for last-minute fun; bake straight from frozen with extra time.
Add garlic powder, paprika, or jalapeños for more flavor.
Use whole wheat pizza dough for a healthier option.
- Prep Time: 15 minutes
- Cook Time: 20 minutes
- Category: Main Dish
- Method: Baking
- Cuisine: American
Nutrition
- Serving Size: 1 skull
- Calories: 380
- Sugar: 4g
- Sodium: —
- Fat: 20g
- Saturated Fat: —
- Unsaturated Fat: —
- Trans Fat: —
- Carbohydrates: 28g
- Fiber: 2g
- Protein: 22g
- Cholesterol: —
Keywords: cheeseburger skulls, Halloween recipes, spooky appetizers, fun party food
Why Make This Recipe
Cheeseburger Skulls are not just a treat for the taste buds; they’re an exciting way to bring a festive element to your dining table. This recipe is simple enough for beginners and offers a unique presentation that will surely impress your guests. Plus, who can resist a delicious cheeseburger in a fun skull shape? Perfect for gatherings, sleepovers, or even themed dinners, these tasty treats will be the star of the show!
⏱️ Time Breakdown
- Prep Time: 15 minutes
- Cook Time: 20 minutes
- Total Time: 35 minutes
- Servings: 4
How to Make Cheeseburger Skulls
Ingredients:
- 1 lb ground beef
- 1 cup shredded cheddar cheese
- 1/2 cup diced onions
- 1/4 cup ketchup
- 1/4 cup mustard
- Salt and pepper to taste
- 1 package pizza dough
- Food coloring (optional for decoration)
✨ Kitchen Tools You’ll Need
« This recipe doesn’t require fancy gadgets, just a few reliable kitchen basics to keep everything simple and stress-free. »
- Large skillet or frying pan
- Sharp knife
- Cutting board
- Measuring cups & spoons
- Mixing bowls
- Wooden spoon or spatula
- Baking sheet
Directions:
- Preheat the Oven: Set your oven to 400°F (200°C). 🔥
- Cook the Beef: In a skillet, brown the ground beef with diced onions, salt, and pepper over medium heat. Stir until fully cooked. 🍳
- Mix in the Goodies: Drain any excess fat. Add in the shredded cheese, ketchup, and mustard. Stir until well combined.
- Prepare the Dough: Roll out the pizza dough on a lightly floured surface. Cut out skull shapes with a knife or cookie cutter.
- Fill and Seal: Place a spoonful of the cheeseburger mixture onto each skull shape. Seal the edges by pressing them together firmly.
- Bake: Arrange the skulls on a baking sheet and bake for 15-20 minutes or until they are golden brown. ⏰
- Decorate (Optional): For a spooky touch, use food coloring to decorate the skulls before serving! 🎨
How to Serve Cheeseburger Skulls
Serve your Cheeseburger Skulls warm right out of the oven. They make a fun and festive appetizer, or you can pair them with a side salad or carrot sticks for a complete meal.
How to Store Cheeseburger Skulls
Store any leftovers in an airtight container in the fridge for up to 3 days. You can reheat them in the oven or microwave, but for the best texture, use the oven!
💡 Pro Tips
- For extra flavor, add spices like garlic powder or paprika to the meat mixture.
- Use a variety of cheeses to mix things up!
- You can freeze unbaked skulls for last-minute fun. Just bake straight from the freezer, adding a few extra minutes to the bake time.
- Try using whole wheat pizza dough for a healthier version.
Variation
Feel free to customize your filling! Try adding diced pickles, jalapeños, or even shredded chicken for different flavors!
FAQs
Can I use ground turkey instead of beef?
Yes! Ground turkey works well and can be a healthier option.
Can I make these ahead of time?
Absolutely! You can prepare them and refrigerate or freeze them before baking. Just bake when you’re ready!
What can I serve with Cheeseburger Skulls?
They pair wonderfully with veggie sticks, chips, or a simple salad for a complete meal.
What if I don’t have cookie cutters?
No problem! You can simply cut the skull shapes freehand with a knife. Have fun with it!