The Dreamy, Creamy Dessert You’ve Been Waiting For
Imagine a dessert so rich, so velvety smooth, and so satisfyingly creamy that you’d never guess it was good for you. That’s exactly what you get with this truly exceptional healthy no bake cheesecake. The moment you take your first bite, you’re greeted by a tangy, yet sweet, melt-in-your-mouth filling that rivals any traditional cheesecake. Its luxurious texture is perfectly balanced by a crumbly, nutty crust with a hint of natural sweetness from dates. The aroma is pure bliss – a subtle blend of fresh dairy, a whisper of vanilla, and the earthy notes of almonds and walnuts. This isn’t just a dessert; it’s a guilt-free experience that proves healthy eating can be incredibly decadent.
Why will you fall head over heels for this recipe? For starters, it requires zero oven time, making it the perfect dessert for warm summer days or any time you want to avoid heating up your kitchen. It’s naturally sweetened and packed with protein from Greek yogurt, turning a classic indulgence into a balanced treat. It’s simple to prepare, impressive to serve, and so delicious that it will become your new go-to for special occasions, quiet nights in, and everything in between.
Time, Servings, and Simplicity
This recipe is designed for ease and convenience. The preparation time is approximately 25 minutes, which includes making the crust and whipping up the filling. There is no active cook time, but the cheesecake does require at least 6-8 hours of chill time in the refrigerator to set properly, so be sure to plan ahead. The total time from start to finish is about 8 hours and 25 minutes. This recipe yields one 9-inch cheesecake, which generously serves 12 people.
Ingredients for Your Healthy Cheesecake Masterpiece
We’re using simple, whole-food ingredients to create a dessert that tastes indulgent but is secretly packed with goodness. Using high-quality ingredients will make a noticeable difference in the final flavor and texture.
For the Nut and Date Crust:
- 1 cup raw, unsalted almonds
- 1/2 cup raw, unsalted walnuts or pecans
- 1 cup pitted Medjool dates (about 10-12 dates), soaked in hot water for 10 minutes if not soft
- 2 tablespoons melted coconut oil
- 1/4 teaspoon sea salt
For the Creamy Greek Yogurt Filling:
- 16 ounces (2 blocks) light cream cheese (Neufchâtel), softened to room temperature
- 1 1/2 cups plain full-fat Greek yogurt, at room temperature
- 1/2 cup pure maple syrup or honey
- 1/4 cup freshly squeezed lemon juice (from about 1-2 lemons)
- 1 tablespoon pure vanilla extract
- Pinch of sea salt
- Optional for firmness: 1 tablespoon gelatin dissolved in 3 tablespoons of cold water (let bloom for 5 minutes then gently heat until dissolved) or agar-agar for a vegan option.
Step-by-Step Instructions for a Perfect No Bake Cheesecake
Follow these detailed steps carefully for a foolproof, creamy, and delicious cheesecake every time. The key is patience, especially during the chilling process!
Part 1: Making the Gluten-Free Nut and Date Crust
- Prepare Your Pan: Gently grease a 9-inch springform pan with a little coconut oil. For extra-easy removal, you can also line the bottom with a circle of parchment paper.
- Process the Nuts: Place the almonds and walnuts into the bowl of a food processor. Pulse several times until the nuts are broken down into a coarse, crumbly texture, similar to sand or graham cracker crumbs. Be careful not to over-process, or you’ll end up with nut butter.
- Add Dates and Binders: Add the pitted and softened Medjool dates, melted coconut oil, and sea salt to the food processor with the nut crumbs. Process continuously until the mixture starts to clump together. It should stick together when you press a small amount between your fingers.
- Press the Crust into the Pan: Transfer the crust mixture to your prepared springform pan. Use your fingers or the flat bottom of a measuring cup to press the mixture firmly and evenly across the bottom and slightly up the sides of the pan. A firm press is crucial for a crust that holds together.
- Chill the Crust: Place the pan in the freezer to set while you prepare the filling. This will take about 15-20 minutes and helps create a solid base for your cheesecake.
Part 2: Creating the Silky Smooth Cheesecake Filling
- Start with Softened Cream Cheese: In a large mixing bowl, add the softened blocks of cream cheese. Using an electric hand mixer or a stand mixer with the paddle attachment, beat the cream cheese on medium speed for about 2-3 minutes until it’s completely smooth and free of any lumps. This step is vital for a silky texture.
- Incorporate Yogurt and Sweetener: Scrape down the sides of the bowl. Add the room temperature Greek yogurt and your choice of maple syrup or honey. Mix on low speed until just combined, then increase to medium and beat for another minute until smooth. Be sure your yogurt is at room temperature to prevent the mixture from becoming lumpy.
- Add Flavor and Acidity: Pour in the fresh lemon juice, vanilla extract, and a pinch of salt. Mix again on low speed until everything is fully incorporated. The lemon juice not only adds a classic tangy flavor but also helps the cheesecake to set.
- Optional Firming Agent: If you’re using gelatin for extra firmness (recommended if you live in a warm climate or want very clean slices), now is the time to add it. While the mixer is on low, slowly stream in the prepared, dissolved gelatin. Mix for about 30 seconds until it’s evenly distributed throughout the filling.
- Assemble the Cheesecake: Retrieve your chilled crust from the freezer. Pour the creamy filling over the crust and use a spatula to spread it into an even layer, smoothing the top.
- The Crucial Chill: Cover the cheesecake loosely with plastic wrap or foil, making sure it doesn’t touch the surface of the filling. Place it in the refrigerator to chill for a minimum of 6-8 hours, or preferably overnight. Do not rush this step! The cheesecake needs this time to firm up completely.
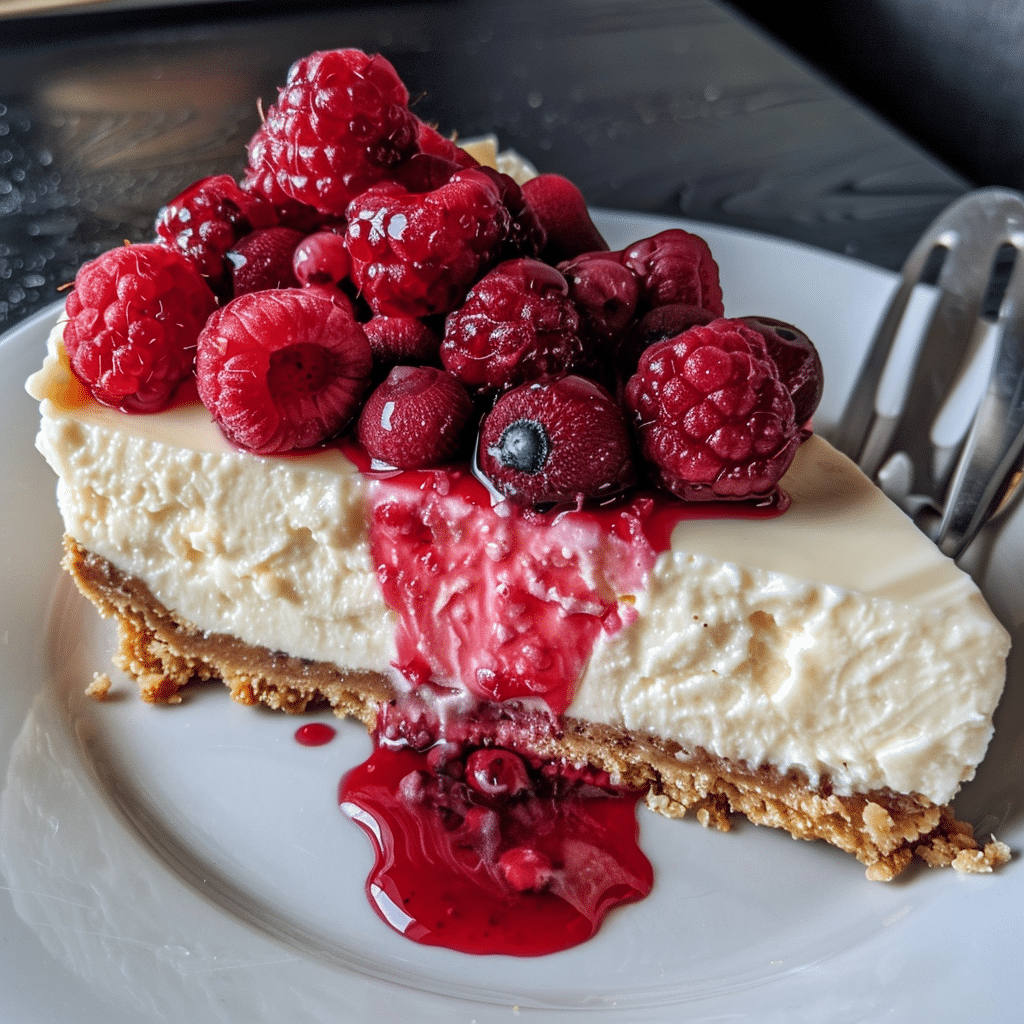
- Serve and Enjoy: Once fully set, carefully run a thin knife around the edge of the pan before releasing the springform collar. Garnish with fresh berries, a drizzle of maple syrup, or lemon zest before slicing and serving.
Pro Tips for Perfect Results
- Room Temperature is Non-Negotiable: For the smoothest, lump-free filling, your cream cheese and Greek yogurt must be at room temperature. Cold ingredients don’t emulsify well and will result in a clumpy texture. Take them out of the fridge at least 1-2 hours before you begin.
- Don’t Over-mix the Filling: While you want to beat the cream cheese until it’s smooth, be careful not to incorporate too much air once you add the other ingredients. Over-mixing can make the cheesecake airy and less dense, affecting its classic texture. Mix until just combined and smooth.
- Patience is a Virtue (Especially for Chilling): Resisting the urge to slice into the cheesecake early is tough, but a proper chill is the most important step for a no-bake recipe. 6-8 hours is the minimum. Chilling overnight yields the best texture and makes for cleaner slices.
- Use a Springform Pan: While not strictly necessary, a springform pan makes removing the cheesecake a breeze without damaging the beautiful crust or smooth sides. It’s a worthwhile investment for any cheesecake lover.
- Achieve Clean Slices: For those picture-perfect slices, use a long, sharp knife. Dip the knife in hot water and wipe it clean between each cut. This simple trick melts the filling just enough to glide through, leaving you with a pristine slice every time.
Variations and Healthy Substitutions
This recipe is a wonderful canvas for your creativity. Here are some ideas to customize your healthy no bake cheesecake:
Crust Variations:
- Oat Crust: For a nut-free option, replace the nuts with 1 1/2 cups of rolled oats. Lightly toast the oats in a dry skillet for extra flavor before processing.
- Seed Power: Add 2-3 tablespoons of chia seeds or ground flax seeds to the crust mixture for an extra boost of fiber and omega-3s.
- Different Nuts: Feel free to swap the almonds and walnuts with pecans, cashews, or macadamia nuts for a different flavor profile.
Filling Swaps and Flavor Add-ins:
- Make it Vegan: Substitute the cream cheese with a high-quality vegan cream cheese and the Greek yogurt with a thick, plain coconut or soy yogurt. Use agar-agar instead of gelatin as your firming agent.
- Fruity Filling: Blend 1/2 cup of fresh or frozen (and thawed) fruit like strawberries, raspberries, or mango directly into the filling for a beautiful color and integrated fruit flavor. You may need to add a bit more of your firming agent to compensate for the extra liquid.
- Chocolate Cheesecake: Add 1/4 cup of unsweetened cocoa powder to the filling along with the other ingredients for a rich, chocolatey version.
- Lemon Overload: For a more pronounced lemon flavor, add the zest of two lemons to the filling mixture. The oils in the zest provide an intense citrus aroma and taste.
Topping Ideas:
- Berry Compote: Simmer 1 cup of mixed berries with 1 tablespoon of maple syrup and 1 tablespoon of water until the berries break down. Let it cool completely before spooning over the cheesecake.
- Melted Dark Chocolate: Drizzle melted high-quality dark chocolate (70% cocoa or higher) over the top before the final chill.
- Toasted Coconut: Sprinkle toasted unsweetened coconut flakes over the finished cheesecake for a delightful crunch and tropical flavor.
Storage and Serving Guidance
Proper storage is key to keeping your cheesecake fresh and delicious. Because it’s a dairy-based dessert, it must be kept refrigerated.
Refrigeration: Store leftover cheesecake in an airtight container in the refrigerator for up to 4-5 days. If you don’t have a container large enough, you can leave it on the base of the springform pan and cover it tightly with plastic wrap. This also helps prevent it from absorbing any other food odors from the fridge.
Freezing: This cheesecake freezes beautifully! You can freeze the entire cheesecake or individual slices. For the whole cheesecake, place it uncovered in the freezer for about 1 hour to flash-freeze. Then, wrap it tightly in a layer of plastic wrap followed by a layer of aluminum foil. It can be stored in the freezer for up to 2 months. To freeze slices, place them on a parchment-lined baking sheet to flash-freeze, then wrap each slice individually and store in a freezer-safe bag or container.
Serving from Frozen: To thaw, transfer the cheesecake from the freezer to the refrigerator and let it thaw overnight. Thawing at room temperature can cause condensation and make the crust soggy. Individual slices will thaw more quickly, in about 2-3 hours in the fridge.
Frequently Asked Questions (FAQ)
Can I make this healthy no bake cheesecake vegan?
Absolutely! To make this recipe vegan, use your favorite brand of vegan cream cheese and a thick, full-fat plant-based yogurt like coconut or cashew yogurt. Ensure your maple syrup is pure and not blended with honey. For the firming agent, you will need to use a plant-based alternative to gelatin, such as agar-agar powder. Follow the package instructions for the agar-agar, which typically involves dissolving it in liquid, bringing it to a boil, and then simmering before mixing it into your filling.
Is this recipe gluten-free?
Yes, it is! The crust is made from nuts and dates, containing no grains or gluten. All the filling ingredients are naturally gluten-free as well. As always, if you have a severe allergy or celiac disease, double-check the labels on all your ingredients (like the cream cheese and yogurt) to ensure they are certified gluten-free and processed in a facility that avoids cross-contamination.
Why is my no bake cheesecake not setting?
This is the most common issue with no-bake cheesecakes. There are a few likely culprits. First, you may not have chilled it long enough. It truly needs a minimum of 6-8 hours. Second, your ingredients might be too thin; using full-fat Greek yogurt and block-style cream cheese (not the whipped kind in a tub) provides the necessary thickness. Low-fat versions contain more water and will not set as well. Lastly, the acidic lemon juice helps with setting, so don’t skip it! If you’re still concerned, using the optional gelatin or agar-agar is a surefire way to guarantee a firm set.
Can I use a different kind of sweetener?
Yes, you can. While maple syrup and honey are excellent liquid sweeteners for this recipe, you could also use agave nectar. If you want to use a granulated sweetener like coconut sugar or a monk fruit blend, it’s best to powder it in a blender first to avoid a grainy texture in your filling. You may need to adjust the amount depending on the sweetness level of your chosen alternative.
What other toppings go well with this cheesecake?
The possibilities are endless! Beyond fresh fruit and compotes, consider a sprinkle of cinnamon, a handful of chopped pistachios for color and crunch, a dollop of coconut whipped cream, or shavings of dark chocolate. For a fall-inspired twist, you could even top it with a healthy apple-cinnamon sauté.
A Note on Nutrition
Please note that the following nutritional information is an estimate and can vary based on the specific ingredients and brands you use. This estimate is for one serving, assuming the cheesecake is cut into 12 equal slices. Each slice contains approximately 350 calories, 10 grams of protein, 25 grams of carbohydrates, and 24 grams of fat. With its significant protein content from Greek yogurt and healthy fats from the nut crust, it’s a far more balanced and satisfying dessert choice than its traditional counterpart.
Print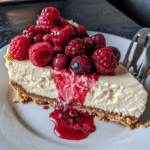
The Ultimate Healthy No Bake Cheesecake (Creamy & Guilt-Free!)
- Total Time: 8 hours 25 minutes
- Yield: 1 9-inch cheesecake 1x
- Diet: Vegetarian
Description
Indulge in this creamy, tangy no-bake cheesecake with a nutty date crust and light Greek yogurt filling. Packed with protein and naturally sweetened, it’s a guilt-free dessert that’s perfect for special occasions or lazy nights.
Ingredients
- 1 cup raw unsalted almonds
- ½ cup raw unsalted walnuts or pecans
- 1 cup pitted Medjool dates (10–12 dates), soaked if needed
- 2 tablespoons melted coconut oil
- ¼ teaspoon sea salt
- 16 oz (2 blocks) light cream cheese (Neufchâtel), softened
- 1½ cups plain full-fat Greek yogurt, room temperature
- ½ cup pure maple syrup or honey
- ¼ cup freshly squeezed lemon juice
- 1 tablespoon pure vanilla extract
- Pinch of sea salt
- Optional firming agent: 1 tbsp gelatin (dissolved in cold water) or agar-agar
Instructions
- Make the crust: Preheat oven to 350°F (if desired; optional for toasting nuts). Combine almonds, walnuts, and optional toasted nuts (if using). Process in a food processor until finely chopped.
- Add soaked dates (drained if pre-soaked), coconut oil, and ¼ tsp sea salt. Pulse until mixture sticks together. Press evenly into a 9-inch springform pan lined with parchment paper. Freeze while preparing filling.
- Prepare filling: In a large bowl, beat cream cheese until smooth. Mix in yogurt, maple syrup, lemon juice, vanilla, and salt. Add gelatin (or agar-agar) mixture if using, to help set (warm gently first if using agar).
- Pour filling over crust. Smooth top. Refrigerate 6-8 hours (preferably overnight) until set.
- Serve chilled with fresh berries or whipped coconut cream (optional).
Notes
- For softer dates: Soak in hot water 10 minutes before using
- Patchy filling texture? Ensure cream cheese and yogurt are at room temperature before mixing
- Vegan swap: Use vegan cream cheese, maple syrup, and agar-agar for gelatin
- Prep Time: 25 minutes
- Cook Time: 0 minutes
- Category: Dessert
- Cuisine: American
Nutrition
- Serving Size: 1 slice
- Calories: Estimated: 250 kcal per serving
- Sugar: 15g per serving (varies by sweetener choice)
- Carbohydrates: 18g per serving
- Fiber: 2g per serving
- Protein: 10g per serving
Keywords: no bake cheesecake, healthy dessert, dairy-free option, nut crust, guilt-free, low sugar, protein rich