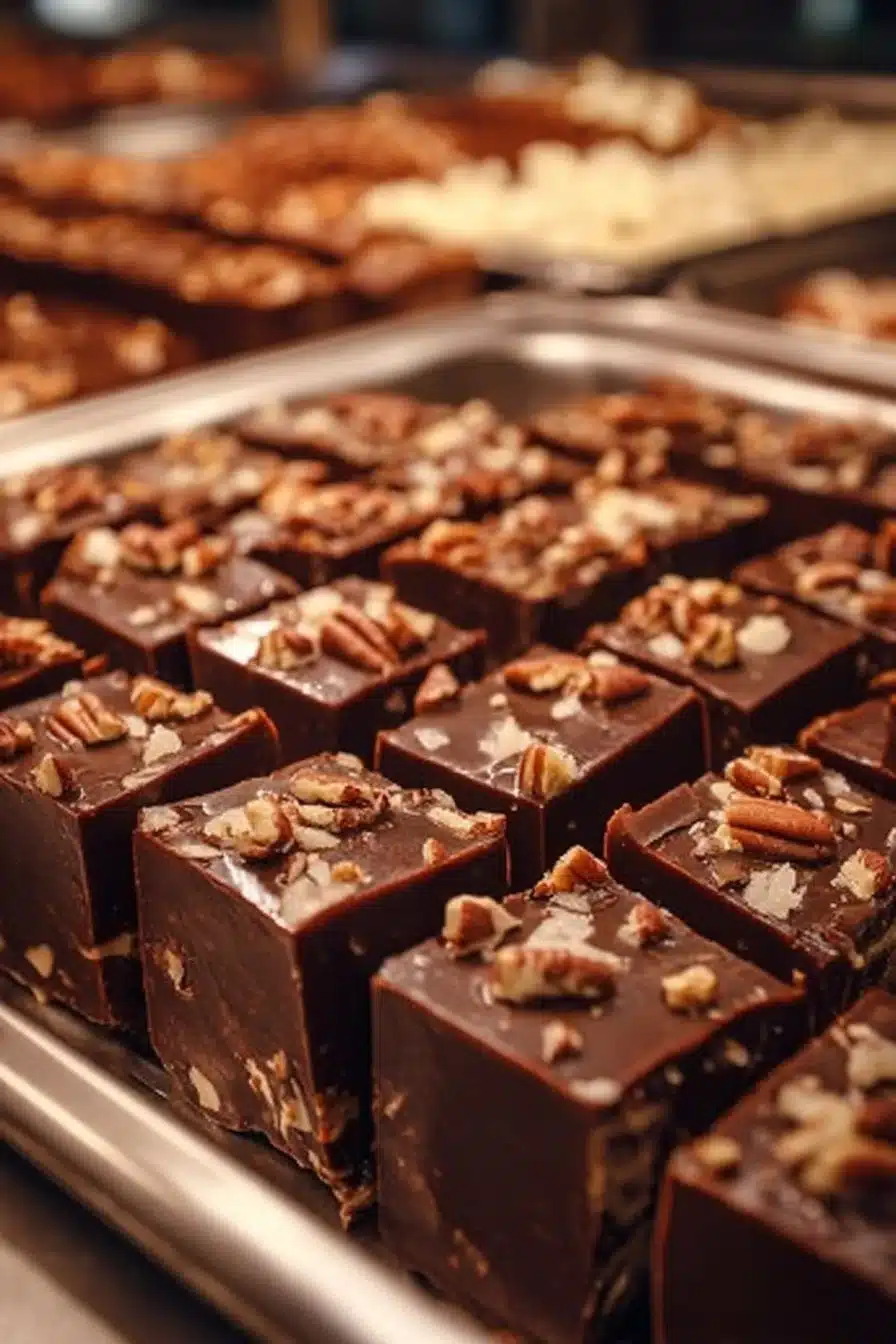
Easy and Delicious Homemade Chocolate Fudge Recipe
There’s something incredibly comforting about walking into a kitchen filled with the sweet aroma of melting chocolate. I can still recall those moments from my childhood when my mom would whip up a batch of Homemade Chocolate Fudge. The sight of the creamy fudge cooling on the counter was an invitation for everyone to gather, share stories, and snatch a taste or two while it set. This recipe isn’t just about dessert; it’s about creating memories with family and friends over a delightful treat, bringing joy to those little moments in life.
Why You’ll Love This Recipe
This Homemade Chocolate Fudge is a true classic that is not only easy to make but also brings a wave of nostalgia. Imagine biting into a piece of smooth, creamy fudge—sweet, rich, and slightly nutty with the optional addition of crunchy nuts. Whether it’s for a holiday gathering, a potluck, or just because you’ve had a long week and need some indulgence, this recipe will bring a smile to your face.
One of the best parts? The simplicity of this recipe means you can whip it up in no time, making it perfect for busy days when you want to add a little homemade magic to your life. And you’ll find that it’s adaptable! With some easy substitutions, you can customize it to fit your family’s preferences or dietary needs.
Ingredients for Homemade Chocolate Fudge
- 2 cups granulated sugar
- 1 cup packed brown sugar
- 1 cup butter
- 1 can (14 oz) sweetened condensed milk
- 2 cups semi-sweet chocolate chips
- 1 tsp vanilla extract
- 1 cup chopped nuts (optional)
Ingredient Notes
- Granulated Sugar & Brown Sugar: These sweeteners create the perfect texture and richness in your fudge.
- Butter: It adds that creamy, luscious mouthfeel. Opt for unsalted to control the saltiness of the fudge.
- Sweetened Condensed Milk: The magical ingredient that ensures a silky-smooth consistency.
- Chocolate Chips: I prefer semi-sweet for a balanced sweetness, but feel free to use milk chocolate or dark chocolate if that’s what you love.
- Nuts: Chopped walnuts or pecans bring a delightful crunch and flavor, but nuts can be entirely omitted if you prefer a nut-free treat.
- Vanilla Extract: Enhances the overall sweetness and aroma of the fudge; it’s a small touch that makes a big difference.
How to Make It
Making Homemade Chocolate Fudge is a breeze! Let’s walk through the steps together for a fail-proof batch of sweet goodness.
Step 1 – Combine the Base Ingredients
In a medium saucepan, combine 2 cups of granulated sugar, 1 cup of packed brown sugar, 1 cup of butter, and 1 can (14 oz) of sweetened condensed milk. As you stir these ingredients together, take a moment to enjoy the sweet aroma filling your kitchen—a perfect reminder of the deliciousness that awaits!
Step 2 – Bring to a Boil
Cook this mixture over medium heat, stirring continuously until it comes to a full boil. This part is crucial, so keep an eye on it! Once the mixture is bubbling away, you can let it simmer for about 4-5 minutes without stirring, allowing it to thicken and develop a rich flavor.
Step 3 – Add the Chocolate and Vanilla
Remove the saucepan from the heat and stir in 2 cups of semi-sweet chocolate chips along with 1 teaspoon of vanilla extract. It will melt beautifully, creating a smooth and glossy fudge base that’s oh-so-satisfying. If you’re adding nuts, fold in 1 cup of chopped nuts at this stage for that added crunch.
Step 4 – Set and Cool
Pour the fudge mixture into a greased 9×13 inch pan. Spread it evenly and let it cool completely on the counter; you can even pop it in the fridge for quicker setting. Once it’s cool, you can cut it into squares and enjoy!
Tips for Success
- Stir Constantly: To prevent burning, keep stirring the mixture while it’s heating. Enjoy the process—this is where the magic happens!
- Don’t Rush the Cooling: Giving your fudge time to cool and set properly will ensure that it holds its shape and texture when cut.
- Use Quality Ingredients: The better your chocolate and butter, the more delicious your fudge will be. Prioritize quality for those special moments.
- Keep an Eye on Timing: Timing is everything when it comes to boiling. Too long can make your fudge grainy, so set a timer for those 4-5 minutes and keep a close watch.
Recipe Variations
Feeling creative? Here are a few fun twists on the classic Homemade Chocolate Fudge to try:
- Nutty Maple Fudge: Swap some of the sugar for maple syrup and add chopped pecans for a delightful twist.
- Mint Chocolate Fudge: Add a teaspoon of peppermint extract along with the chocolate chips for a fresh, minty flavor.
- Peanut Butter Fudge: Stir in 1 cup of creamy peanut butter along with the chocolate chips for an irresistible combination.
- Blondie Fudge: Use white chocolate chips instead of semi-sweet for a different take on the classic, rich in buttery flavor.
- Spicy Cinnamon Fudge: Add a teaspoon of cinnamon and a sprinkle of cayenne pepper for a warm kick that surprises.
Serving Ideas
This fudge can be enjoyed in a variety of delightful settings:
- Wrapped for Gifts: Cut into squares, wrap them in pretty paper, and they make perfect homemade gifts for friends and neighbors.
- On Dessert Platters: Place a variety of sweets and this fudge on a dessert table for parties or gatherings.
- With Coffee or Tea: Enjoy a square with your afternoon cup of coffee or tea for a delightful pick-me-up.
Storage and Freezing
To keep your fudge fresh, store it in an airtight container at room temperature for up to two weeks. You can also refrigerate it for extended freshness. If you’d like to freeze it, cut the fudge into squares, place them in a single layer in an airtight container with parchment paper between layers, and store for up to 3 months. Just thaw at room temperature when you’re ready to enjoy!
Nutrition Facts (per serving)
| Nutrient | Amount | |—————-|——–| | Calories | 100 | | Protein | 1g | | Carbs | 14g | | Fat | 5g | | Fiber | 0g | | Sodium | 20mg |
FAQ About Homemade Chocolate Fudge
Can I use different types of chocolate?
Absolutely! While semi-sweet chocolate chips are traditional, you can easily substitute with milk chocolate or dark chocolate, depending on your preference.
Is there a way to make it dairy-free?
Yes! Substitute butter with a dairy-free variety and use dairy-free sweetened condensed milk. Just ensure all your chocolate is dairy-free as well.
Can I make this fudge without nuts?
Yes! If you’re not a fan of nuts or have allergies, simply leave them out. The fudge will still be deliciously rich and creamy.
How do I know when my fudge is ready to be removed from the heat?
The fudge should be at a full boil for 4-5 minutes without stirring. You can also test it by dropping a small amount into cold water; it should form a soft ball when cooled.
What can I do if my fudge becomes grainy?
If your fudge turns out grainy, it may have boiled too long. Avoid this by setting a timer and keeping a steady watch during cooking. If it does happen, heating it gently while stirring may smooth it out.
In a Few Words
Creating Homemade Chocolate Fudge is more than just making a treat; it’s about sharing the sweet moments and flavors that unite us with family and friends. Each square you cut serves as a reminder of home-cooked goodness and the joy of simple recipes that never fade from memory.
Conclusion
With this easy and delicious recipe, you’re not just making fudge; you’re creating moments—those cozy kitchen memories filled with laughter and sweetness. I encourage you to gather your loved ones, make this fudge together, and take a moment to enjoy the delightful process. After all, the kitchen is the heart of the home, and every delicious piece of fudge is a step closer to creating those cherished memories. Happy cooking!