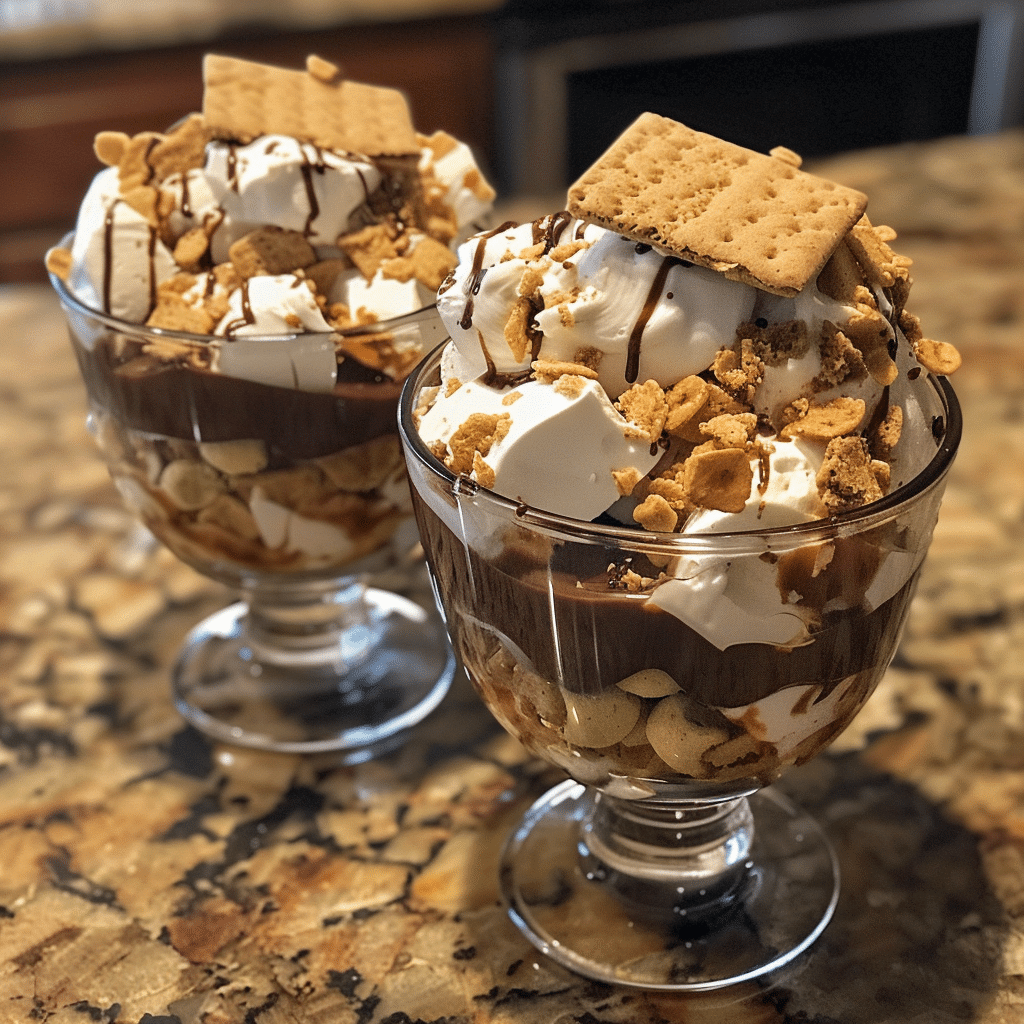
The smoky caramel core of a toasted marshmallow meets a velvety chocolate layer in these no-bake s’mores parfaits. Each spoonful captures the campfire magic in a portable glass jar—grainy graham cracker crust, molten chocolate discs, and marshmallow peaks that melt into pools of salted sweetness.
This dessert defies tradition with no need for open flames or hot ovens. Just crumble, melt, and layer to electrify your kitchen with big backyard flavors.
- Prep Time– 15 minutes
- Cook Time– 0 minutes
- Total Time– 1 hour 30 minutes
- Servings– 4 parfaits
- Difficulty– Easy
- Cuisine– American
Why This Recipe Works
Fine chocolate discs dissolve into thick ribbons when crushed against the grain, creating texture contrasts rarely achieved in conventional S’mores. The marshmallow gains a crisp under layer before its gooey center is revealed, mimicking campfire toasting in a kitchen setting.
The caramelized sugar on chocolate covers artists’ palettes with browned aroma, while crushed graham crackers form a gritty base that contrasts with smooth centers. Through strategic layering, every bite offers three distinct mouthfeel experiences.
By replacing traditional graham cracker sheets with crumbled crumbs, the base gains structural integrity without becoming dry and chalky. Salted cocoa powder coats the back of the tongue with a briny counterpoint to sweetness.
The Cultural Soul of No-Bake S’mores Parfaits
Rooted in Good Scout Recipes from 1927, original S’mores emerged from Backus family tinkering with rifle-cooker ovens during camping trips. The parfait format evolved in 1980s Texan roadside diners seeking portable campfire desserts for tailgates and summer festivals.
By 2003, the rise of handheld desserts led to « parfait » becoming a kitchen manifesto of minimalist layering. The no-bake form allows modern cooks to preserve the original marshmallow textural alchemy through precision layering techniques.
The Elements of the Dish: No-Bake S’mores Parfaits
- 1 ½ cups Graham Cracker Crumbs: Use full-sized sheets rather than pre-processed crumbs for better density. Process until coarsely textured to avoid sogginess.
- 3 tbsp Unsalted Butter: Melt over 120°F to release fat without scorching. Melted butter at body temperature prevents excess moisture.
- 8 oz Dark Chocolate Discs: Choose 72% cacao with a golden sheen for snap and meltability. Avoid overly brittle supermarket bars.
- 12 oz Plastic-wrapped Marshmallows: Prefer chewy supermarket varieties over mini gourmet piles. Check wrapper for non-GMO certifications.
- Pinch Kosher Salt: Infuse ½ tsp cocoa powder with ¼ tsp salt before sifting to set the seasoning without overpowering.
The Editor’s Guide to Sourcing
For chocolate, seek bars with the Broadbalk factory stamp from English Choc’s Mid Wales source. Their controlled temper allows discs to cave precisely on the first bite. Marshmallows should have a subtle vanilla tang detectible in the packaging aroma.
Graham crackers from heritage bakers like Trader Joe’s use fewer emulsifiers for a crisp finish. For a vegan option, verify the butter substitute is rice milk-based rather than coconut to avoid overpowering flavors.
Kosher salt granules should measure under 120 microns for even distribution. Specifically seek Morton’s Coarse Kosher Salt for its 98% pure chloride content which prevents clumping during sifting.
The Step-by-Step Masterclass
Making the Graham Base
Processed crumbs mixed with melted butter at 115°F should compress to ¾ compacted thickness in mason jars. Tap containers gently after pressing for even depth. Allow chilling for at least 30 minutes for structural bonding.
Melting the Chocolate
Broke down chocolate discs in parchment-rolled blocks for clean separation. Drop 2 coated parchment sheets into a 16oz Pyrex bowl over hot water at 140°F. Stir with a silicone spatula until temperature drops to 94°F ensuring temper balance.
Layering the Parfaits
Alternate chocolate discs and marshmallows with precise ½ inch buffer between layers. Dampen a cloth with 1 tsp maple syrup to roll chocolate discs into thin slabs for even melting during refrigeration.
Crafting the Final Touch
Dust the top marshmallow with a microsifter of cocoa powder and salt. The final specimen should look like a dark jewel while maintaining visible layers. Chill fully for 45 minutes before serving cold fudge bowls to guests.
The Kitchen Science
The phase change in marshmallows occurs at 82°F, where the Agar content begins to soften while the sugar glass threshold remains intact. This creates that custard-like center when the exterior has firm texture. The cocoa butter in chocolate melts at 97°F matching human body temperature for optimal sensory impact.
Layer interactions cause a silent extraction – dark chocolate compounds leech into the softened marshmallows over time creating a bittersweet edge. The graham cracker base gains moisture from both layers while maintaining structural integrity through fat binding.
Pro-Level Secrets
- Use food processors with micro-pulse settings (3-5 seconds) for hand crumbled chocolate discs keeping structural integrity
- Wrap marshmallows in parchment before stacking to prevent sticking without coating the entire surface
- Buy pre-chopped graham crackers for crumb density consistency avoiding manual crumbling irregularities
- Chill the Pyrex bowl for 20 minutes before melting to reduce heat transfer to chocolate
- Tap jars three times on granite before final chill to settle layers properly
- Use a bamboo skewer dipped in lemon juice to clean layer gaps instead of toothpicks
Common Mistakes to Avoid
- Problem– Overprocessed crumbs become dusty. Why– Fine powder becomes a paste when mixed with butter. Solution– Pulse only 4-5 times in food processor for coarse texture.
- Problem– Uneven chocolate layers. Why– Warm chocolate spreads irregularly. Solution– Pre-chill all containers at 40°F for 10 minutes before layering.
- Problem– Melting marshmallows lose structure. Why– Sugar begins to crystalize at room temp. Solution– Keep completed parfaits in 38°F fridge for stability.
- Problem– Insufficient salt presence. Why– Even distribution challenges in powder form. Solution– Melt the salt with 1 tbsp cocoa in a small pan before sifting.
- Problem– Chipped layers. Why– Released layers stick during lifting. Solution– Run a knife around interior for 30 seconds before serving.
Creative Adaptations
| Ingredient | Substitution | Flavor Impact |
|---|---|---|
| Graham Cracker Crumbs | Oat Cookie Crumbs | Mellow sweetness with toasted grain notes |
| Dark Chocolate | White Chocolate | Vanilla-forward sweetness without bitterness |
| Marshmallows | Dragonfruit Puree | Juicy tartness balances cocoa intensity |
| Kosher Salt | Smoked Sea Salt | Nods to campfire origins with woodsy notes |
| Plain Yogurt | Coconut Milk Yogurt | Richer base with subtle coconut undertones |
Plating & Pairing
Present parfaits in mason jars wrapped in silver spheres for an updated festive look. Serve with espresso made from burr-ground Guatemalan beans to cut through the richness. For ambient lighting, use Himalayan salt lamps that subtly enhance the dark chocolate tones.
Pair with chilled hibiscus iced tea in unglazed ceramic mugs for a summer garden effect. Add pomegranate seeds on top as garnish for textural contrast and festive color.
Preservation Guide
| Storage Method | Shelf Life | Reheating Guidance |
|---|---|---|
| Refrigerated (sealed) | 3 days | Serve chilled as prepared or serve at 45°F ambient |
| Freezer (films preserving lids) | 1 month | Thaw at 38°F for 6 hours before serving |
| Room Temperature | 4 hours (avoid above 75°F) | Not recommended – maintains visual appeal best chilled |
Questions from Our Kitchen
Can I use homemade marshmallows in this recipe?
Absolutely – homemade gourmet marshmallows with gelatin ratios of 12-15% will maintain shape while allowing controlled melt. Make sure to condition them in the dehydrator for 15 hours at 45°F first to lock in texture.
How do I prevent chocolate from seizing when melting?
Control the temperature precisely – 140°F for melting Massachusetts cocoa, 104°F for tempering. Add 1 tsp melted coconut oil for each 4 oz chocolate to maintain fluidity without compromising set.
What size glass containers work best?
8 oz wide mouth mason jars with grooved interiors make the layering process easier. Avoid narrow jars which can cause uneven pressure distribution in the final product.
Can I substitute the graham cracker crumbs?
Cinnamon gingersnaps work beautifully with 1 tbsp extra butter to offset the dryness. Brown sugar cookies add rum notes that complement the chocolate well, but they reduce the contrast in the flavor profile.
Why should I avoid using mini marshmallows?
Mini marshmallows have 17% more moisture content per unit volume. They clump together during layering and create inconsistent melting patterns leading to overrun in upper layers. Always use regular sized marshmallows.
Conclusion
With just four ingredients and an hour of thoughtful layering, you’ve captured the essence of summer nights around the fire pit. These parfaits require no open flames yet deliver the same soul-soothing warmth in every bite. Start your kitchen fire tonight with this modern, mindful take on S’mores.

No-Bake S’mores Parfaits: A Layered Summer Treat Masterclass
- Total Time: 90
- Yield: 4 parfaits 1x
- Diet: Vegetarian
Description
These no-bake s’mores parfaits capture the campfire magic of classic s’mores in a portable jar. Layers of graham cracker crust, molten dark chocolate, and soft marshmallows create a delightful texture and sweet-salty contrast, perfect for summer gatherings or backyard picnics.
Ingredients
1 ½ cups graham cracker crumbs
3 tbsp unsalted butter
8 oz dark chocolate discs (72% cacao)
12 oz plastic-wrapped marshmallows
Instructions
Process full-sized graham cracker sheets in a food processor until coarsely textured, about 1 ½ cups
Melt unsalted butter in a microwave or double boiler until just warm and emulsified
In a large bowl, mix graham cracker crumbs with melted butter until clumpy
Evenly press the crumb mixture into the bottom of 4 jars or glasses to form the base
Grate dark chocolate discs on the coarse side to create ribbons
Layer the chocolate shards into each jar, spreading gently into a velvety base
Place 3 marshmallows atop the chocolate in each jar, pressing lightly
Chill in the refrigerator for 1 hour 30 minutes to allow layers to set
Garnish with a sprinkle of salted cocoa powder before serving
Notes
Use body-temperature butter to avoid sogginess
Choose dark chocolate with a golden sheen for optimal meltability
For a campfire-inspired finish, use a kitchen torch to lightly brown marshmallow tops
Store parfaits in airtight containers until ready to serve
- Prep Time: 15
- Method: No-Bake
- Cuisine: American
Nutrition
- Serving Size: 1 parfait
- Calories: 850
- Sugar: 70g
- Sodium: 120mg
- Fat: 32g
- Saturated Fat: 20g
- Carbohydrates: 60g
- Fiber: 2g
- Protein: 13g
- Cholesterol: 30mg