Cozy Peppermint Bark Cups: Easy Festive Treats
There’s something truly magical about the holiday season that warms the heart and brings back fond memories of time spent in the kitchen. The aroma of melting chocolate fills the air, mingling with the cool, crisp scent of peppermint as the world grows cold outside. I remember sitting at the table with my family, watching my mom create these simple yet indulgent peppermint bark cups, every bite a delightful burst of festive flavor. Making these Peppermint Bark Cups is a beautiful way to carry on that tradition, bringing together the warmth of chocolate and the refreshing taste of peppermint in a cozy and inviting way.
As the holidays approach, it’s the perfect time to dive into making these easy-to-follow Peppermint Bark Cups. They’re not only a treat for the eyes but a sweet escape into comforting memories that I know you and your loved ones will cherish just as much as I do.
Why You’ll Love This Recipe
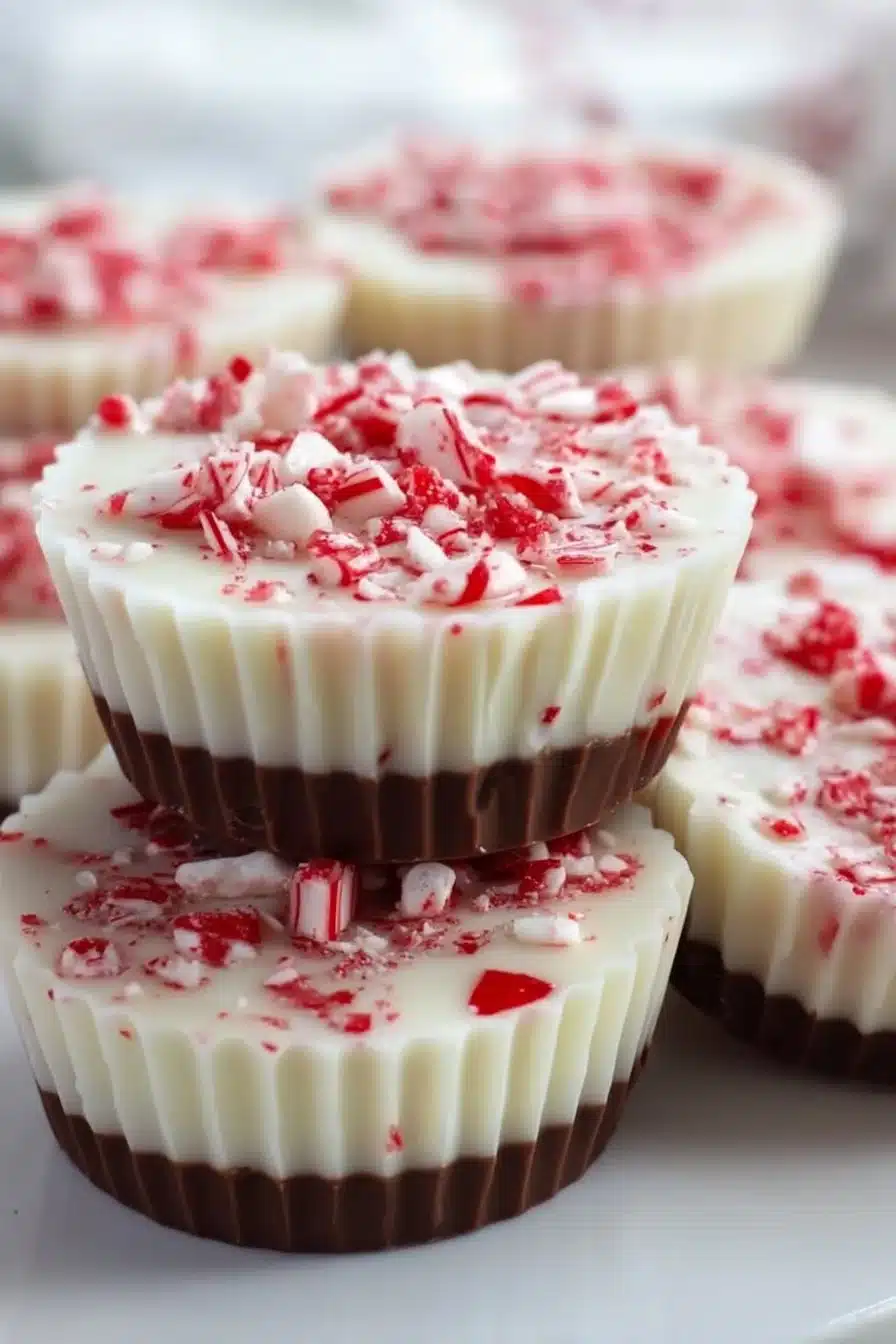
These Peppermint Bark Cups are quick to whip up, making them a fantastic choice for busy families. The process is straightforward — melt, mix, and chill — so you can easily get your little ones involved. Plus, they boast a beautiful layer of rich semisweet chocolate topped with smooth white chocolate and a sprinkle of crushed candy canes, creating a perfect balance of flavors and textures. They are a charming addition to your dessert table or a thoughtful homemade gift for friends and neighbors.
Ingredients for Peppermint Bark Cups
To make these delightful treats, you will need:
- 12 ounces semisweet chocolate chips
- 12 ounces white chocolate chips
- 1 teaspoon peppermint extract
- Candy canes, crushed (about 3-4 candy canes, depending on preference)
- Mini cupcake liners
Ingredient Notes
- Semisweet and White Chocolate Chips: Feel free to choose high-quality chocolate chips, as they will significantly enhance the taste of your peppermint bark cups. If you’re looking for a healthier option or have dietary restrictions, consider using dairy-free chocolate chips for the semisweet layer.
- Peppermint Extract: This ingredient is crucial to achieving that signature peppermint flavor. If you want a lighter peppermint taste, adjust the amount of extract to suit your preferences.
- Candy Canes: Crushed candy canes add a delightful crunch and a pop of color. You can use sugar-free versions if wished, or try crushed up peppermint candies as an alternative.
How to Make It
Step 1 – Melt the Semisweet Chocolate
Begin by melting the semisweet chocolate chips in a microwave-safe bowl. Heat them in 30-second intervals, stirring after each session until smooth. Be careful not to overheat, as burnt chocolate can turn grainy and lose its creamy texture.
Step 2 – Assemble the Base Layer
Once the chocolate is melted, spoon the semisweet chocolate into the mini cupcake liners, filling them halfway. I find it helps to use a small cookie scoop or a spoon to keep things neat. Gently tap the cupcake liners on the counter to remove any air bubbles and to level the chocolate. Now, pop these into the refrigerator to set for about 30 minutes or until firm.
Step 3 – Create the White Chocolate Layer
In another bowl, melt the white chocolate chips using the same microwave method, stirring until smooth. Once melted, add the peppermint extract and mix well to combine. Pour this delectable mixture over the set semisweet chocolate layer. The creamy white chocolate beautifully contrasts with the dark chocolate.
Step 4 – Add the Finishing Touch
Now comes the fun part! Sprinkle the crushed candy canes on top of the white chocolate layer while it’s still warm—this ensures they adhere nicely. Return the cups to the refrigerator to set fully, which should take another 30 minutes. Once hardened, gently peel the cups away from the liners, revealing the pretty layers beneath.
Tips for Success
- Chill Times Matter: Make sure each layer is fully set in the fridge before layering the next one. This prevents the flavors from bleeding into one another.
- Petite Portions: If you want to make these treats even more delightful, consider using different sizes of cupcake liners. Mini or even standard-sized versions can create variety on your dessert table.
- Tempering Chocolate (Optional): For a glossier finish, you might explore tempering your chocolate, though it’s not necessary for this recipe. It just adds an extra layer of shine!
Recipe Variations
If you’re feeling a bit adventurous, try these fun twists on the classic peppermint bark cups:
- Nutty Delight: Add chopped nuts like walnuts or pecans to the chocolate layers. They add a lovely root flavor and satisfying crunch.
- Spicy Twist: Mix in a dash of cinnamon or cayenne pepper to the semisweet chocolate for a warm kick that complements the cool peppermint.
- Chocolate Drizzle: After the cups are set, drizzle melted dark chocolate on top for a decorative touch and added richness.
- Change the Toppings: Experiment with different types of crushed candies, like Oreo cookies or seasonal holiday candies, for a unique twist.
- Vegan Version: Use vegan chocolate chips and a dairy-free cream alternative to make a cruelty-free treat that everyone can enjoy.
Serving Ideas
These Peppermint Bark Cups are not only delicious but also visually appealing, making them perfect for any gathering. Serve them on a festive platter next to other holiday treats, or package them in cute tins tied with a ribbon for a thoughtful gift. They’re excellent as party favors or as part of a hot cocoa bar along with marshmallows and whipped cream.
Storage and Freezing
Keep these luxurious treats in an airtight container in the refrigerator, where they’ll stay fresh for up to two weeks. If you plan to make them in advance, you can freeze them! Just ensure they’re separated with parchment paper in a freezer-safe container. Allow them to come to room temperature before serving, so they soften slightly for that melt-in-your-mouth goodness.
Nutrition Facts (per serving)
| Nutrient | Amount per Serving |
|—————|————————|
| Calories | 120 |
| Protein | 1g |
| Carbs | 15g |
| Fat | 7g |
| Fiber | 0g |
| Sodium | 5mg |
FAQ About Peppermint Bark Cups
Can I use other types of chocolate?
Absolutely! Feel free to experiment with milk chocolate or dark chocolate for different flavor profiles. Each option brings its unique taste and sweetness.
How do I know when the chocolate is melted completely?
When the chocolate appears smooth and shiny without any lumps, it’s ready. Stir after each interval to help it melt evenly.
Can children help with this recipe?
Definitely! This recipe is a fantastic way for kids to get involved in the kitchen. They can help with crushing the candy canes, pouring the melted chocolate, and even decorating the cups.
What if I can’t find mini cupcake liners?
If mini cupcake liners are unavailable, you can use muffin tins without liners, but make sure to grease them properly for easy removal.
How do I make these allergy-friendly?
To make these peppermint bark cups allergy-friendly, substitute the chocolate chips for dairy-free options, and use gluten-free candy canes.
In a Few Words
Making Peppermint Bark Cups is a delightful way to spread festive cheer. This sweet, creamy treat captures the essence of holiday gatherings and the joy of sharing homemade goodies with loved ones. It’s a little act of kindness that can brighten someone’s day and fill your home with the flavors of the season.
Conclusion
In a cozy kitchen filled with laughter and warmth, these Peppermint Bark Cups become more than just a treat; they become a cherished memory. They invite you to pause, savor the moment, and share with those around you, bringing a bit of sweetness to everyday life. I hope you enjoy making these delightful cups as much as I do, and may they fill your home with joy, love, and a sprinkle of peppermint magic this holiday season!