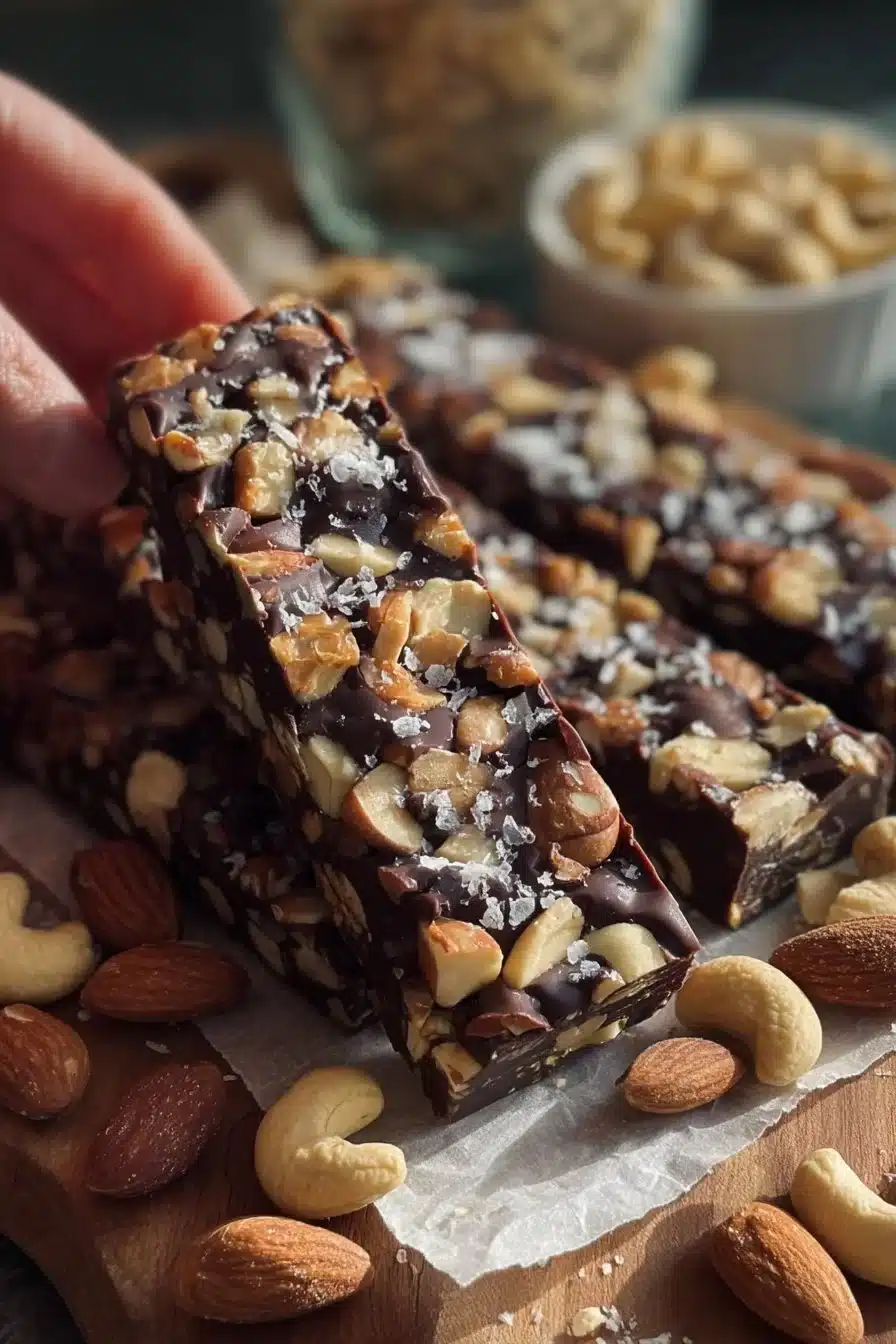
Easy Dark Chocolate and Sea Salt Nut Bars: A Cozy Treat
There’s something beautifully nostalgic about the aroma of baked goods wafting through your home. I can still remember weekends spent in my grandmother’s kitchen, where we created delicious memories one cozy recipe at a time. These Dark Chocolate and Sea Salt Nut Bars embody that warm, sweet nostalgia—perfect for satisfying those afternoon cravings, or as a delightful addition to lunchboxes. With a combination of crunchy nuts and a hint of sweetness from dark chocolate, they’re both comforting and rewarding, making them an ideal treat for busy families like yours and mine!
Oh, and let’s not forget that they can be effortlessly whipped up in just a few steps. What better way to spend time in the kitchen than crafting something delicious that everyone will love? 
Why You’ll Love This Recipe
These nut bars are an absolute game-changer when it comes to snacking. They’re not only easy to make but also packed with nutrients. Each bite is delightful, with the perfect balance of nuttiness from the mixed nuts, richness from the dark chocolate, and that little sprinkle of sea salt to elevate it all.
Whether you’re looking for a wholesome snack to curb those sweet cravings, something to fuel your kids during their afternoon activities, or a quick and delightful treat to share at gatherings, these bars will never disappoint. Plus, they are gluten-free and easily customizable based on your family’s preferences, making them a versatile addition to your recipe collection!
Ingredients for Dark Chocolate and Sea Salt Nut Bars
To make your own delicious nut bars, gather the following ingredients:
- 1 cup mixed nuts (almonds, cashews, walnuts)
- 1/2 cup dark chocolate chips
- 1/4 cup honey or maple syrup
- 1/4 teaspoon sea salt
- 1/2 teaspoon vanilla extract
- 1/4 cup rolled oats (optional)
- 2 tablespoons nut butter (optional)
Ingredient Notes
- Mixed Nuts: Feel free to experiment! Throw in your favorite nuts, or even some seeds, to create your own blend.
- Sweetener: Maple syrup adds lovely caramel notes, while honey offers a floral sweetness. Both work beautifully, so choose according to your preference.
- Nut Butter: This ingredient enhances the richness and texture of your bars. I particularly love using almond butter for a hint of sweetness and creaminess.
- Oats: For those looking to add more fiber, rolled oats are a wonderful addition, but they can be omitted if you prefer a nut-heavy bar.
- Dark Chocolate Chips: If you have dietary restrictions, look for dairy-free chocolate chips to keep this recipe indulgent yet suitable for everyone!
How to Make It
Creating these nut bars is as simple as mixing and baking—so let’s get started!
Step 1 – Preheat and Prepare
Preheat your oven to 350°F (175°C) and line an 8×8 inch baking pan with parchment paper. This will make it easier to remove the bars later and ensure perfect edges.
Step 2 – Mix the Nuts
In a large mixing bowl, combine the mixed nuts, along with the rolled oats if you’re using them, and the dark chocolate chips. Give it a gentle stir and let all those textures mingle.
Step 3 – Melt and Combine
In a small saucepan over low heat, melt the honey (or maple syrup) with the nut butter and vanilla extract until the mixture is smooth and well-combined. Pour this delicious liquid gold over the mixed nuts and give it a solid stir until everything is thoroughly coated.
Step 4 – Spread and Sprinkle
Transfer the mixture into your prepared baking pan, pressing it down firmly to ensure it holds together. Make sure it’s compact—this helps the bars maintain their shape when you cut them. Lightly sprinkle the sea salt evenly over the top to add a touch of savory contrast.
Step 5 – Bake to Perfection
Pop the pan into your preheated oven and bake for about 15-20 minutes, until the edges are lightly golden and your kitchen smells divine. Keep an eye on them; you want that perfect golden hue!
Step 6 – Cool and Slice
Once baked, let it cool completely in the pan before cutting into bars. Patience is key here; it makes all the difference in keeping your bars intact!
Tips for Success
Choosing Nuts: Opt for raw or lightly roasted nuts for a fresher flavor, and avoid overly salted options unless you like a saltier bar!
Binding Ingredients: The combination of honey or maple syrup with nut butter acts as a great binding agent. If your mixture seems too dry, add a tad more nut butter or a splash of water.
Cooling: Allow the bars to cool fully in the pan to set properly. If you try to cut too soon, they may crumble!
Cutting Bars: Use a sharp knife for even cuts; a serrated knife works wonders if you find they crumble a little.
Recipe Variations
These bars are perfectly versatile! Here are a few ways to mix things up:
Add Dried Fruit: Try adding in dried cranberries, cherries, or apricots for a unique flavor twist and a touch of sweetness!
Seeds Galore: Incorporate chia seeds or sunflower seeds for added crunch and nutrition.
Spiced Nut Bars: Add a pinch of cinnamon, nutmeg, or even some cocoa powder to the nut mix for a warm hint of spice.
Coconut Bliss: Toss in some unsweetened shredded coconut for a tropical feel.
Nut-Free Version: Replace nuts with puffed rice or seed mixes for allergy-friendly bars that your kids will still love!
Serving Ideas
These nut bars have a delightful reach when it comes to serving. You can enjoy them on their own, or pair them with:
- A warm cup of tea or coffee for a delightful afternoon snack.
- Slices of fresh fruit like apples or bananas to balance the richness.
- A dollop of Greek yogurt for a creamy contrast.
They also make fabulous additions to your kids’ lunchboxes—just slice and pack them for an on-the-go treat.
Storage and Freezing
These nut bars can easily be stored in an airtight container at room temperature for up to a week. If you want to keep them longer, they freeze beautifully! Just wrap each bar in parchment paper, place them in a resealable bag, and freeze for up to three months. When you’re ready to enjoy, simply pop them in the fridge overnight to thaw.
Nutrition Facts (per serving)
| Nutritional Value | Per Serving |
|——————-|————-|
| Calories | 150 |
| Protein | 4g |
| Carbohydrates | 18g |
| Fat | 7g |
| Fiber | 2g |
| Sodium | 30mg |
FAQ About Dark Chocolate and Sea Salt Nut Bars
Can I use other nuts in this recipe?
Absolutely! Feel free to swap in any nuts you have on hand, such as pecans or macadamia nuts. Just remember to keep an eye on the texture and flavor balance.
How do I make these nut bars dairy-free?
Simply use dairy-free dark chocolate chips and nut butter to keep them free from any dairy; it’s just that simple!
Can I make these nut bars ahead of time?
Yes! These bars are perfect for meal prep. Just make them on the weekend and store them for a quick snack throughout the week.
What if I want a sweeter bar?
If you prefer a sweeter treat, increase the honey or maple syrup to 1/3 cup. Just be mindful, as this may alter the texture slightly.
How can I tell when the bars are done baking?
Look for lightly golden edges. They should be firm to the touch but still soft in the center—trust me, the aroma will guide you, too!
In a Few Words
Every bite of these Dark Chocolate and Sea Salt Nut Bars is a reminder of all things cozy and heartfelt. They not only satisfy that ever-present sweet tooth but also fuel the energy needed for our busy days. Simple to prepare, wholesome, and utterly delicious—what more could anyone ask for?
Conclusion
Cooking doesn’t have to be a chore; it can be an expression of love and creativity. These nut bars are an excellent way to bring a little more joy to your kitchen routine. Whether cozying up with a book, sharing with family, or prepping snacks for a busy week, these bars will fill your home with warmth and offer a little bright spot in each day.
Now grab those mixing bowls and let your kitchen fill with the lovely scents of baking. I can’t wait for you to experience the delight of creating these nut bars in your own home. Enjoy every bite!
Print
Easy Dark Chocolate and Sea Salt Nut Bars
- Total Time: 30 minutes
- Yield: 8 servings 1x
- Diet: Gluten-Free
Description
Delicious nut bars made with mixed nuts and dark chocolate, perfect for snacks or lunchboxes.
Ingredients
- 1 cup mixed nuts (almonds, cashews, walnuts)
- 1/2 cup dark chocolate chips
- 1/4 cup honey or maple syrup
- 1/4 teaspoon sea salt
- 1/2 teaspoon vanilla extract
- 1/4 cup rolled oats (optional)
- 2 tablespoons nut butter (optional)
Instructions
- Preheat your oven to 350°F (175°C) and line an 8×8 inch baking pan with parchment paper.
- In a large mixing bowl, combine the mixed nuts, rolled oats (if using), and dark chocolate chips. Stir gently.
- In a small saucepan over low heat, melt the honey (or maple syrup) with the nut butter and vanilla extract until smooth.
- Pour the mixture over the nuts and stir until everything is coated.
- Transfer to the prepared baking pan and press down firmly. Sprinkle sea salt over the top.
- Bake for 15-20 minutes until edges are golden and fragrant. Let cool completely before cutting into bars.
Notes
Allow cooling fully in the pan for best results. Use a sharp knife for even cuts.
- Prep Time: 10 minutes
- Cook Time: 20 minutes
- Category: Snack
- Method: Baking
- Cuisine: American
Nutrition
- Serving Size: 1 bar
- Calories: 150
- Sugar: 8g
- Sodium: 30mg
- Fat: 7g
- Saturated Fat: 1g
- Unsaturated Fat: 5g
- Trans Fat: 0g
- Carbohydrates: 18g
- Fiber: 2g
- Protein: 4g
- Cholesterol: 0mg
Keywords: nut bars, dark chocolate, sea salt, snack, gluten-free